|
|
|
In This Section:
[] [] []
|
Chapter 5
<- Previous | Next ->
|
 |
 |
|
|
|
|
 1.
Introduction 1.
Introduction
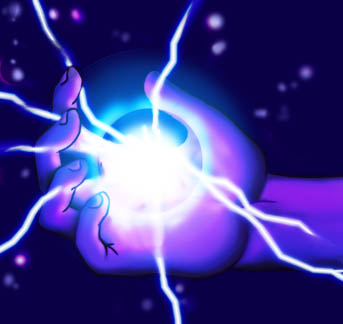
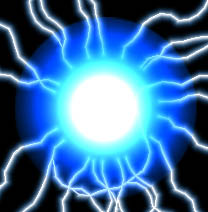
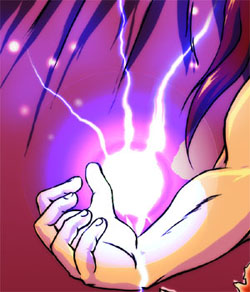
Creating an electrical
effect is all about lighting and dodges. You're probably
familiar with the white to bluish purple quality
associated with electrical discharges. Electricity looks best when presented against a dark backdrop, looking white hot against the more subdued colors.
Click on the image to the
right to see a larger version of the electricity
effect forming in a hand.
Xenofex's Electrify filter is a useful filter to have in your arsenal.
It's a third party filter by Alien Skin Software
that can be found on Photoshop's filter menu, on the
Xenofex submenu once installed. The
filter allows you to create awe-inspiring electrical
effects with ease, great for images where your
characters are showing off their special powers.
|
|
|
|
|
|
2.
The Xenofex Electrify Filter
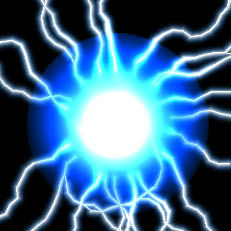
In Photoshop, open an image
that requires an electrical effect. Create a new
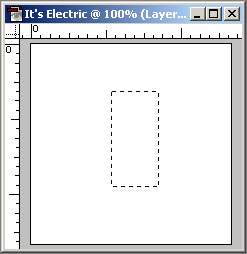
layer. Decide where you want the electricity to
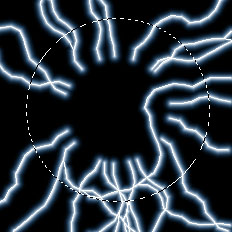
radiate from, and draw a selection around that area.
The Xenofex Electrify
filter will render electrical bolts in all
directions along the outer edge of a selection.
Electricity generally looks
more natural with a circular selection, which is the
type of selection used for the electricity-in-hand
example above.
|
If you make a selection box
like this...
|
...the lightning
will render outside the box like this.
|
|

|
|
|
|
|
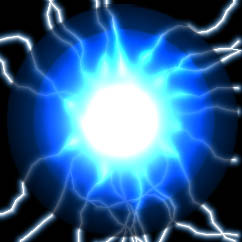
If you inverted the selection
(so that everything but the center was selected),
the results would look something like the
image on the left. The edge of the selection is
where the electricity stems from -- keep that in
mind as you make a selection that fits your needs.
There's
an option within the filter menu that controls the
amount of spill over from the edge of the selection
into the unselected area. In the case of the image
on the right,
the option, called Inside Masking, was set at
around 50%. This halves the amount of glow radiating
from outside the selected area. The previous
examples above were set to 0% Inside Masking.
Below are some examples of
how the Inside Mask slider modifies the amount of
color seepage into the selected area.

|

|
|
|
|
|
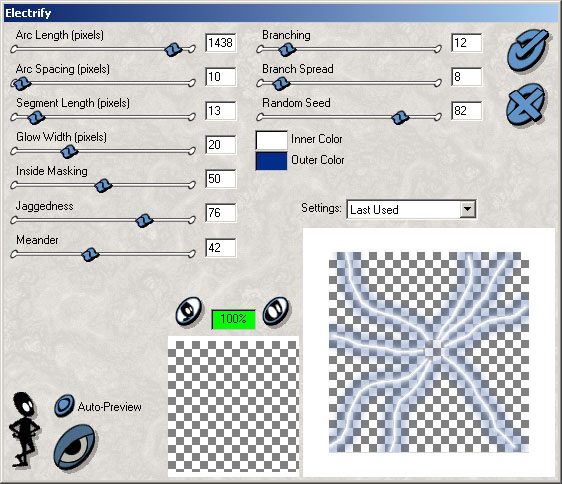 Since
it's important to know how each of the sliders will
affect the image, the following is a quick run down
on the sliders and their properties. Since
it's important to know how each of the sliders will
affect the image, the following is a quick run down
on the sliders and their properties.
Arc Length specifies the
distance the bolts travel, measured in pixels.
Arc Spacing
determines the distance
between the starting points of each separate bolt. A
lower number allows more bolts to fit around the
parameter of the selection.
Segment Length
controls the length of each individual segment on a
bolt. A lower number makes the bolts twisty and
jagged, while a higher number makes the bolts
straight.
Glow Width
is the size of the outer color edge.
Inside Masking
changes the visibility percentage
of the filter within the selection
mask.
Jaggedness
controls the jaggedness of the bolts.
Meander aimlessly
moves the bolts around the selection.
Branching
controls the likelihood
of branching divisions within bolts.
Branch Spread
intensifies the splitting branches.
Random Seed
randomizes the image within the other allotted
constraints.
You'll probably want to keep your
Inner Color
set to white and your Outer
Color set to a color
that suits your image; blue, red, and yellow look
especially vibrant.
Adjust the sliders to optimize
the lightening bolts so that they suit your needs. Clicking on the
blue check mark button will apply the Electrify filter onto your actual image.
|
|
|
|
If you haven't already, put your electricity in front of a colored or black
backdrop. This allows it to be seen more clearly. If your
electricity needs to be enlarged or stretched, modify it now.
|
To make the electricity more
interesting and less artificial, you'll want to
erase random sections of the electricity. Set your
eraser tool to airbrush on low opacity and carefully
break up the currents and fizzle out arches.
|
|
 3.
Fine-Tuning the Bolts 3.
Fine-Tuning the Bolts
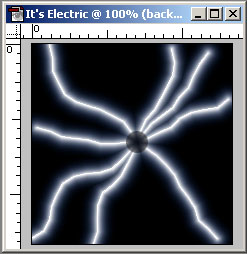
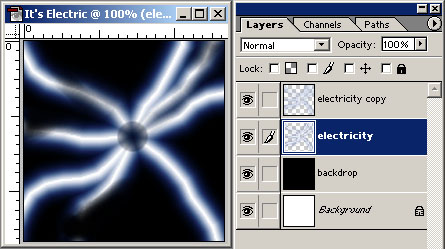
Increasing the Voltage
Duplicate the
electricity layer.
The degree of glow emitted
by the electrical bolts can be greatly intensified
by running the Gaussian Blur filter (2.0 to 5.0
pixels) on the duplicated layer. Once blurred, set the layer composition to
Hard Light or Color Dodge -- whichever one produces
a favorable amount of intensity. If the effect is
too overwhelming, you can lower the opacity of the
duplicated layer.
|
|
|
|
|
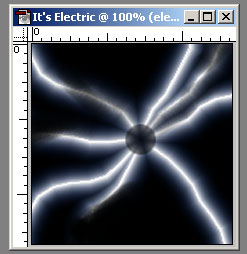
The Glow Step 1
On its own, the lightening looks
weak. It needs to be radiating from a source, and this source, if onscreen, should be much more intense than the individual
arcs.
Making the core is a multi-step
process. First, create a new layer above the layer
that contains the electrical arcs. Create a circular selection
about twice the size of the empty center, like the
example on the right shows.
Select a suitable color for the core. The same color
used for the glowing electrical arcs
works best, but other colors like red, purple, or
blue could be used as well.
Choose the Radial Gradient tool and
go over to the options menu. Make sure that a
checkmark is placed next to both dither and transparency.
Set the gradient fill on Foreground To Transparent.
With the Gradient Tool as
your cursor, click and hold the mouse button (or stylus)
in the center of the selected circle area. Keep the
button depressed and drag the gradient tool a short
distance past the outer edge of the selection. Release the mouse button and a
circular Gradient will
be created.
|
On a new layer, create a
selection that's twice as large as the hole in the
center.
|
|
|
|
|

These are
the Gradient menu settings for the radial gradient
fill in Photoshop
6.0.
Earlier versions of Photoshop have a different
layout, but similar menu options. 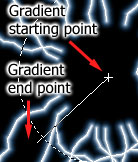
Starting from the center, click and drag the gradient tool
just slightly outside the selection circle.
|

A radiating blue circle is
created.
|
|
|
|
|
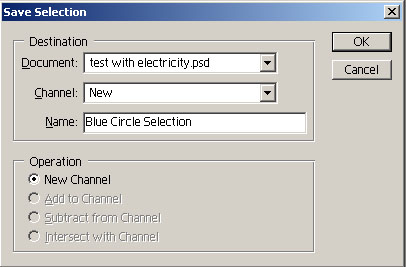
You'll now want to save your
circular selection for later use.
Once the Gradient Fill is complete,
choose Save Selection on the Select menu. This
action brings up the Save Selection window. Enter a
name for your selection, and choose OK.
|
|
|
|
|
|
Step 2
Although
the radiating circle is complete, the center is
still weak. To intensify the effect, the center needs a strong dose of bright
white. This will make the lightening look better,
and also give the electrical arcs a more cohesive starting point.
This step is similar to Step 1. Again, start
by creating a new layer atop
the last. Make a circular selection that is large
enough to fill the central gap between bolts, no
larger. Choose white as your foreground color and
use the Radial Gradient tool to fill the selected
area. As
with the blue circle, the white circle should
gradually become transparent as it leaves the
center.
|
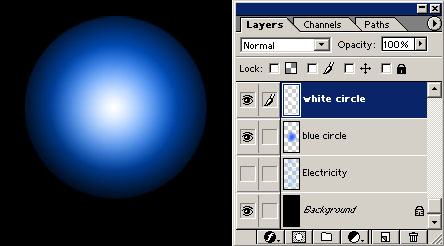
These two overlapping
layers serve as the basis for the glow.
|
|
|
|
|
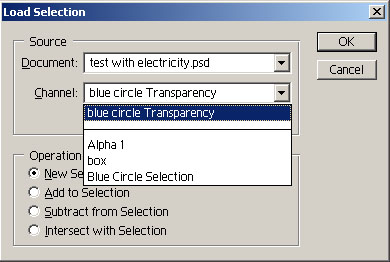
Step 3
Turn
off all layers except for the white circle and the blue
circle. Click on one of these visible layers so that
it's highlighted on the layers menu. Then, choose
Load Selection on the Selection menu. When the Load Selection
window appears onscreen, click on the Channel
drop-down menu and select the previously saved channel
(mine was called "Blue
Circle Selection"). This action reselects the
area surrounding the two circles.
Choose Copy Merged on the
Edit menu. This will copy both visible layers. Then
choose Paste on the Edit menu to paste the combined
data onto a new layer. Make sure that this new layer
is above the Blue and White circle layers.
Give the new layer an appropriate
name, such as "Combined". This new circle
layer needs to be repositioned so that it's
perfectly aligned with the previous two circle
layers.
|
|
|
|
|
|
Step 4
Set the "Combined" layer's
color
composition method to Color Dodge. Drop the layer
opacity to 75%, and look at how the circle almost seems to emit light. Turn back on the
other layers, such as the electricity layer and
examine how the layers blend together. The electricity should combine with the
glow almost seamlessly. If the glow is too
small, you can enlarge each of the three
glow layers by choosing Free Transform or
Numeric Transform on the Edit menu.
|
|
|
Step 5
The image to the right of
Step 4 shows minor gaps between the glow and
electric bolts. Creating a dodge layer above the
previous layers helps build a bit more seamless
interconnectivity between the glow and the
bolts.
To build the dodge
layer, make a new layer above the previous layers
and fill it with black. Change the
composition method on this layer to Color Dodge. From here,
use the airbrush tool to intensify the bolts where
they meet up with the glowing circle to help connect
them. The intensity can be increased or decreased by
varying the luminance of the airbrushed
color. White creates the most striking dodge.
|
The effects of the Color
Dodge layer.
|
Final image with an
additional circular gradient underneath the circular
Color Dodge layer.
|
|
Final Notes
The great thing about lighting and special effects in images is that
there are so many different ways to produce results.
This was one example of how to do an
electrical effect. Try substituting your own techniques and
altering the method as required. For example, try substituting the
overlying Color Dodge layer with some simple airbrushed
white set to Color Dodge. Add speckles of discharged energy around the
light source by dabbing little circles with the
airbrush tool on the electricity layer and then
intensifying them by repeating the process on the
top Color Dodge layer.
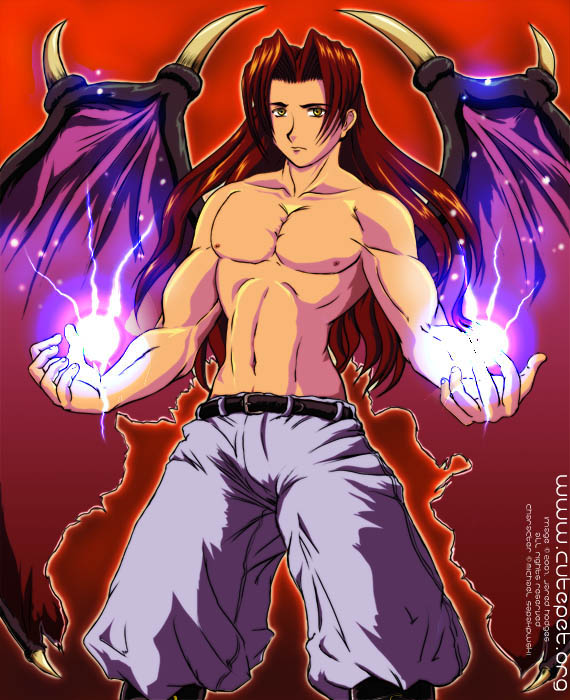
If your character artwork is done in a cel style, you may want to reconsider using filtered
electricity effects. The realistically rendered appearance of the electricity can
look unusual and
inconsistent when compared to the color separated cel work. Weigh the pros against the cons and
decide if your work would best be suited with cel style electrical bolts or the rendered looking variety.
Click on the image to the
right to see the completed, full sized version.
|
|
|
|
|
|
|