|
|
|
In This Section:
[] []
|
Chapter 4
<- Previous | Next ->
|
 |
 |
|
|
|
|
 1.
Introduction 1.
Introduction
Painter's watercolor brushes
simulate traditional watercolor tools. However, anyone who's worked with traditional
watercolors will be quick to spot the differences between the
two mediums. For instance, in Painter 6.0, the watercolors
do not bleed and defuse like traditional
watercolors, nor do they dry over time. This
limits the possibility of "happy
accidents" as are common with traditional
watercolors, but also allows for more control with
an otherwise unpredictable medium. Painter's
watercolor tool may not perfectly imitate
traditional watercolors, but it's still an
excellent and useful tool.
Painter's watercolors are more similar to the other
digital coloring tools, then traditional watercolors. The color comes out in
circular dabs of various width and opacity. The
big difference between the watercolor tools and
the other tools is the gummy abrasiveness, and
their opacity when colors are layered. The
watercolor brush pulls underlying color with each new stroke,
blending the colors at the same time.
The watercolor tool can
be used for many different coloring tasks. Lindsay
likes to use them for quickie images when color is
not the focus; I like to use them like acrylic paints or gouache,
layering them on heavy. Many other artists use
them for what they were intended to do, simulate
watercolors. There's really a lot you can do with
this brush, so take some time and experiment.
The Watercolor Layer
Watercolors don't appear
on any visible layer. The brush's stroke data is located on a layer
that is separated from the others in the program.
This layer, known as the wet layer, isn't represented on the layers
menu nor can you modify settings, such as opacity,
for this layer.
Unlike normal layers, where you can use as many as you wish, only one wet layer
may be used. Therefore, color separations can only
be achieved by either masking portions of
your image or by carefully applying the colors to their appropriate
areas. It's worth noting that you can also separate
colors by completing a section of your image (for
example, finishing all coloring on the hair), and then choosing
Dry on the Canvas menu. This will drop the wet layer into the
background layer, effectively allowing you to
start a new wet layer that won't affect sections
that have already been completed. Once a section
is dropped, however, keep in mind that you won't
be able to work into it anymore with the
watercolor tool, so dry with caution!
The wet layer holds the
color data for your watercolors, but it relies on
the canvas layer for visibility. If you hide your
canvas (click on the eye next to the canvas so
that the eye shuts), any watercolor strokes
that you've
made instantly become invisible.
The color of the canvas
will affect the watercolors. If the canvas is a color
other than white, the translucent watercolors
will become a darker shade, taking on the
properties of the canvas color. Using
watercolors on colored paper can lead to some
interesting image effects. Try experimenting and
see what type of results you get.
|
|
|
|
|
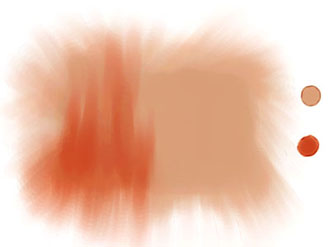
How Watercolors Work: 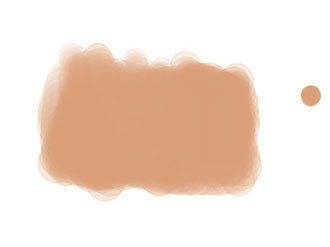
Step 1
The paper color is set
to pure white (default). The base color used here is
a light reddish brown hue. This first pass was done with a large simple water brush and was used to lay down a base tone of color. If you look at the edges, you can
see the clearly visible
semi-opaque circles that make up your watercolor strokes.
|
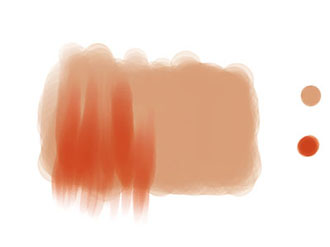
Step 2
In the image above, an earthy
red tone was painted over the first layer of colors.
I tend to paint the watercolors with the simple
water brush set on a low opacity like 20%. Using
this method, the red comes through in a glazed semi-opaque
fashion. The paint strokes practically blend
themselves as they're laid down.
|
|

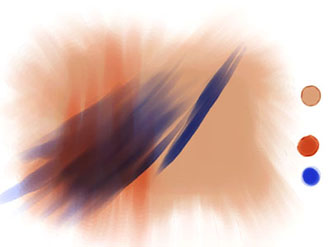
Step 3
 To further blend
the colors, I switched from the simple water brush to the
pure water brush. When you make the switch in tools,
you may notice that the edges of the watercolor area
become noticeably darker. This is because of the Wet
Fringe slider setting in the Water section of the
Brush: Controls palette. If the slider is set above 25%, the edges become very noticeable. To further blend
the colors, I switched from the simple water brush to the
pure water brush. When you make the switch in tools,
you may notice that the edges of the watercolor area
become noticeably darker. This is because of the Wet
Fringe slider setting in the Water section of the
Brush: Controls palette. If the slider is set above 25%, the edges become very noticeable.
|
Step 4
The edges are blended
out using the pure water brush. The earthy reds
blend with the brown colors beneath then when
they're pulled, creating new variations in color.
The colors are dried (choose Dry off the
Canvas menu) and become part of the canvas. These colors are
no longer on the wet layer and can
no longer be modified by the watercolor tools. Any
new watercolors applied overtop of these dried
colors will serve as a glaze, and will not actually modify
the underlying colors.
|
|
|
Step 5
The light blue (as seen in the
circle on the lower right side of the picture) takes
on a dark shade when painted overtop of the dried
red and light brown colors. Watercolors are
transparent, allowing them to be effected by the underlying canvas color. This is
why I started with a white canvas when using the watercolor
tool for practical application. As always,
don't be afraid to experiment!
|
|
|
|
|
2.
Preparation
Papers
Just like real water coloring,
the painting will be affected by the type of paper
used.
The watercolor tool is probably affected more by
the paper than any other tool, and this can be used
to your advantage if you plan ahead. The watercolors will mimic attributes of
the paper, flowing off of
elevated areas, and sinking into grooves and indentations.
Using watercolors in conjunction
with the paper textures can produce some excellent special effects.
For general usage, I would suggest using a smooth featureless
paper (refer to the Papers section
under the Painter
Basics Chapter for information on how to
create this paper) or a paper that has very
little texture like Regular Fine, which is included
with the Painter program.
|
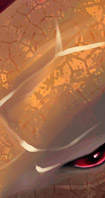
The iridescent scales on
this snake's head were done quickly with remarkable
results. The look was accomplished by brushing
over the painted image at low opacity with the
simple water brush while the paper type was
set to "Veination". This is a default paper that
can be found in the Awesome paper library, included
with Painter 6.0.
|
|
Brushes
For the bulk of this
watercolor tutorial, you'll mostly be using two
custom created watercolor brushes, which I will
explain how to make in this section. Besides
these, we'll also need to create two Opaque Detailer
brushes, which are based off of a pencil variant. The
Opaque Detailer brushes will be used for cleanup and
finishing touches. I gave these brushes names like
"Custom Simple Water" because I wanted to
distinguish them from the default brushes in the
application. You can name your brush variants
whatever you like. ^_-
Custom Simple Water:
 This is your all-purpose watercolor painting brush, a variant of
the Simple Water brush. Throughout the painting
process, you'll need to resize this brush very
often. When the brush is sized up large, it's great
for laying down washes, filling large areas with
color, or even blending. When the brush is sized down,
it excels at detailed color blending, mixing, and
creating areas of colorful precision detail
throughout your image. This is your all-purpose watercolor painting brush, a variant of
the Simple Water brush. Throughout the painting
process, you'll need to resize this brush very
often. When the brush is sized up large, it's great
for laying down washes, filling large areas with
color, or even blending. When the brush is sized down,
it excels at detailed color blending, mixing, and
creating areas of colorful precision detail
throughout your image.
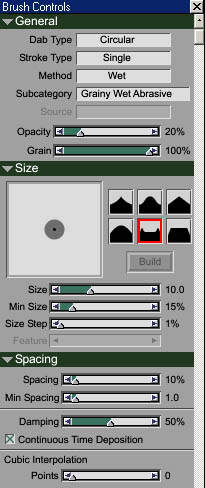
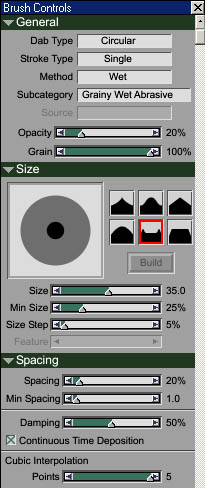
Unfortunately, the Simple
Water brush packaged in with Painter can't handle
small details or blending colors very well, so the
settings will need to be tweaked slightly.
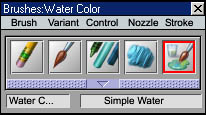
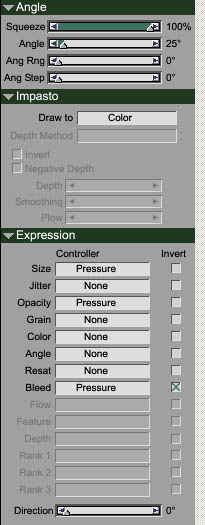
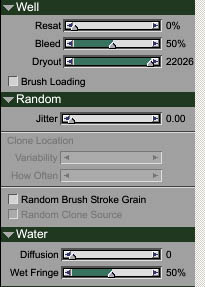
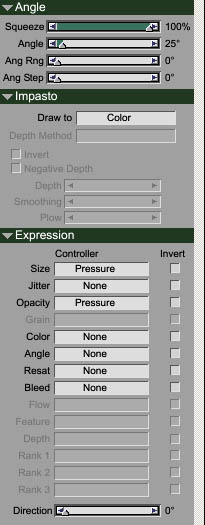
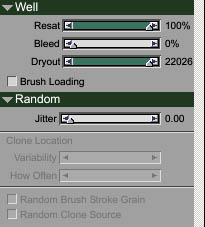
To create the Custom Simple Water brush,
first start off with the standard Watercolor Simple Water brush and modify
its brush settings
as follows.
|
|
|
|
|
|

|
Change the settings so they
look
the same as what we've presented here.
Then, go to the Brushes palette and
save your variant with a new name.
I'll be referring to this brush as
Custom Simple Water, but you can call
yours whatever you wish.
|
|
|
|
Custom Pure Water:
This
brush is used purely for blending colors and paper
effects.
Blending: When the opacity is set low on this
brush, around 20%, the brush
strokes gently blend colors when you apply low to medium
pressure with your stylus. Using heavy pressure
with your stylus will actually pick up an
underlying color and push it around your image as
if you were finger-painting.
Paper effects: Setting the opacity down
to about 10% creates a brush that is excellent for
expressing paper textures in your image. A gentle
stroke will subtly blend the underlying colors
while expressing the highlights in a paper
texture. A heavier stroke will heavily blend the underlying
colors, and make the texture much more apparent.

The colors
purple and yellow are blended together in a smooth
gradient by
using the Custom Pure Water brush on a non-texture
paper.

Using
the above gradient, we choose a paper
type with a fancy texture.
This shows the effects of a gentle brush stroke with
the Custom Pure Water brush
while the "Connectivity" paper texture is
chosen.
Notice the shiny iridescent quality.
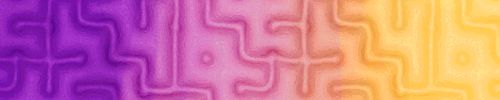
Again, the same purple to
yellow gradient is used, only this time applying
heavy pressure.
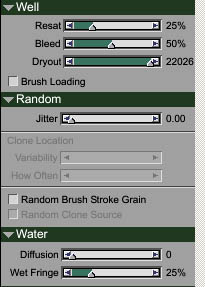
To create the
Custom Pure Water brush, first start off with the standard
Watercolor Pure Water brush, and modify its brush
settings as follows.
|
|
|
|
|
|
|
Change the settings so that
they
look the same as what we've
presented here. Then, go to the Brushes
palette and save your variant with a new name.
I'll be referring to this brush as
Custom Pure Water.
|
|
|
|
|
Custom Opaque Detailer
Pencil:
 Unlike
the other two brushes, this is not a watercolor brush.
It's a standard brush that shows up on normal
layers, like the other non-water based tools in
Painter. Brush strokes made with the Opaque Detailer
Pencil should be on a layer separate from the line
art and the watercolors. The purpose of this brush
is to clean up the
line work, and add details and highlights to your
image. Unlike
the other two brushes, this is not a watercolor brush.
It's a standard brush that shows up on normal
layers, like the other non-water based tools in
Painter. Brush strokes made with the Opaque Detailer
Pencil should be on a layer separate from the line
art and the watercolors. The purpose of this brush
is to clean up the
line work, and add details and highlights to your
image.
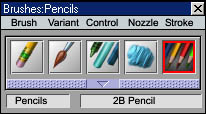
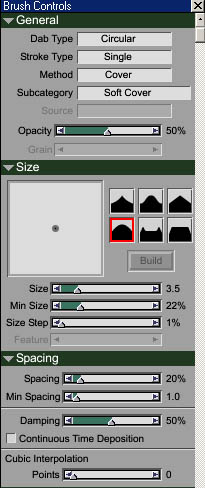
To create this brush,
first start off with the standard Pencils 2B
Pencil brush and modify its brush settings
as follows.
|
|
|
|
|
|
|
Just like with the other brushes,
modify the brush's settings to the ones
shown here. When you're done, go to the
Brushes palette and save your
variant with a new name.
I'll be referring to this brush as
Opaque Detailer Pencil.
|
|
|
|
|
Setting up
your image for water coloring
Once your
papers and brushes are prepared, you're almost ready
to start coloring! Open your line work in Painter.
The line work should be clean and dark. The line art does not need to be transparent
for the sake of water coloring, but it's always nice
to have the option of separating the lines from the
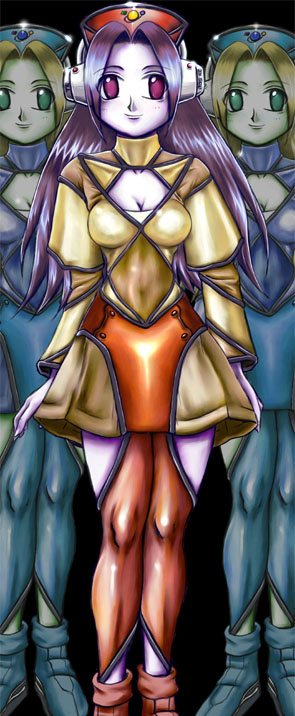
color later. In the image I'll be using as my
example, my line art was done in Painter using the
pencil tool. This makes for a nice clean outline,
without being as obtrusive as inked line art. It
works great for images that you intend to paint.
|
|
|
|
|
|