|
|
|
In This Section:
[]
[]
[]
[]
[]
|
Chapter 4
|
 |
 |
|
|
|
1.
Introduction to Color Choice
Before getting into detail on how to lay down the base colors, I'd like to discuss color choice. A lot of artists have problems with picking out appropriate colors -- lights, darks, and base colors - especially in the case of skin tones! This section should help with the problems associated with color choice.
Color selection can be done in a variety of art
programs but for the purpose of this section, I'll
be using Photoshop.
|
|
2.
Color Selection Tools
|
|
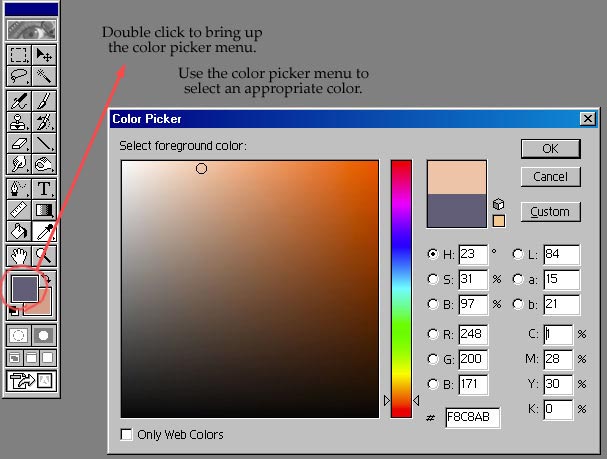
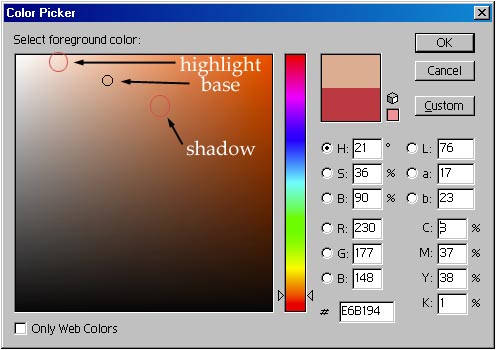
Color picker menu
To choose a color, double click
on the Foreground/Background Color box on the
Tool palette to bring up the Color Picker menu. Slide the bar up and down the color scale to find the appropriate color family, and then choose a dark
or light value of that color. Alternatively, if
you know the hexadecimal code, RGB, or CMYK
number of the color you wish to select, you can
plug that into the Color Picker menu to obtain
your desired color.
|
|
|
|
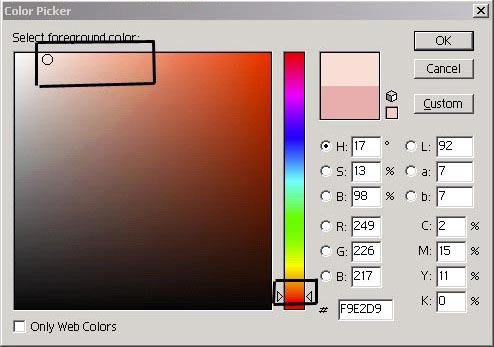
This is my recommended range of colors on the
Color Picker
menu for general Caucasian skin tones that
are used
in the majority of anime artwork. I've boxed off the best
areas to select colors from, ranging from pinker tones,
to browner tones.
|
|
|
Eyedropper tool
If you're doing an image of a character that has already been created, just open up another image of the character and eyedrop the colors from that image. This way, you'll be using the exact same colors that were used on the other
picture.
You could also try using the eyedropper tool to borrow skin colors from photos and other images until you get the hang of selecting your own colors with the
Color Picker.
|
|
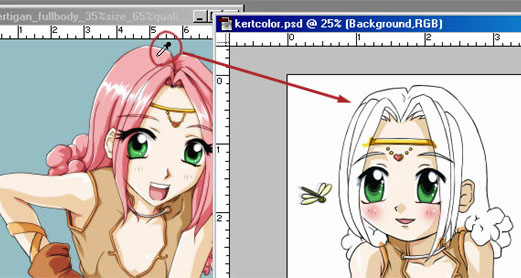
Her hair
is eye dropped from a previously created image.
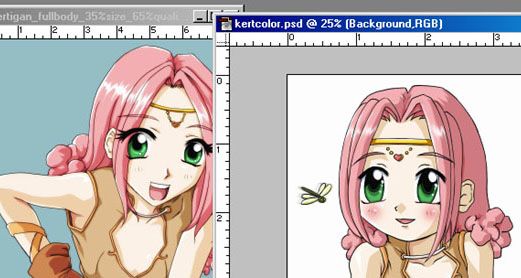
Colors
perfectly match the colors in the original
image, courtesy of our friend the magnificent
eyedropper tool.
|

Depending on your
version of Photoshop, the eyedropper tool may
be placed in a slightly different position.
|
|
|
 3.
Skin Colors 3.
Skin Colors
The majority of anime style character's skin stays within the parameters
I've set above in the Color Picker image, but depending on the race, gender,
ethnicity, or species, etc) of your character, you might
want to try experimenting outside that range.
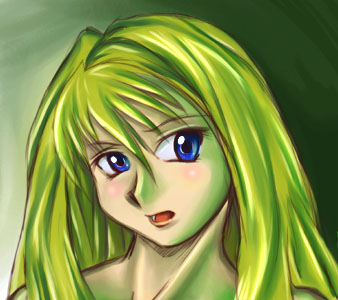
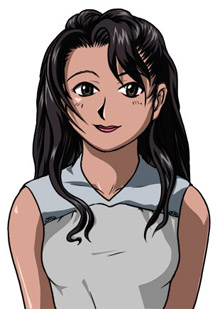
Skin tone based on lighting
Keep in mind that lighting can greatly affect the
colors on your character. Skin, and most other
materials will generally take on the properties of the
light hitting it. For example, if the character is under a green spotlight,
their skin color will have a green hue.
In the picture to the right, the girl has a
green light shining on her, so the shadows and
highlights of her skin and hair colors have a
green hue.
|
|
 Skin tone based on race, genes, or ethnicity. Skin tone based on race, genes, or ethnicity.
The majority of anime artwork comes from Japan,
which is a fairly homogeneous
country. It goes without
saying that it's unusual to see anyone of
African, Hispanic,
or even Caucasian descent portrayed in anime, because it would be unusual to see a
these types of people walking
around Japan. Due to this lack of exposure to
diversity, and the difficulty presented in
portraying ethic characters; race and ethnicity are generally overlooked in
the highly stylized world of anime and manga,
with few exceptions. As an exception, the anime Cowboy Bebop comes to
mind, where characters of all racial
background and ethnic cultures are constantly
shown onscreen.
|
|
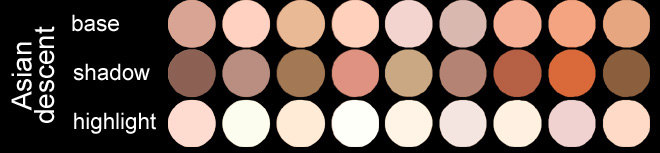
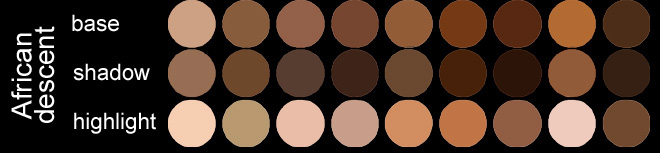
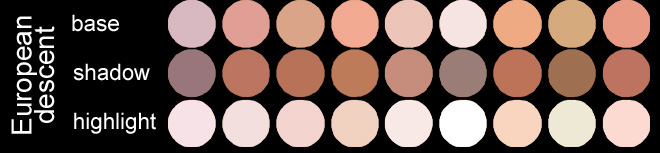
Skin Tone Examples
Try being experimental with your characters and
their skin tones. We've included some examples
of skin tones found in a couple of different ethnic groups.
Obviously, the colors shown below aren't going to
work for everyone in every situation. What you
see below is by no means the end-all of skin
color palettes. It wouldn't be possible to include
every minute variation of skin tone on a chart. Many of these tones were eye dropped out of
photographs using the techniques explained in
the above section regarding the eyedropper tool. Try out these colors
or even experiment with other colors on your
characters. To use, simply save and open one of the
following skin palettes in the art program of
your choice, and eye drop your desired column of
base, shadow and highlight colors.
|
|
 Ethnic
Traits - One point to remember about
characters -- many manga and anime styles tend
to simplify characters down to a triangle nose
and big expressive eyes set in a rounded heart
shaped face. When you're dealing with anime
style artwork, you're working with a very
stylized caricature. It's exaggerated, and often
time fails to suggest any sort of ethnic or
racial background. Ethnic
Traits - One point to remember about
characters -- many manga and anime styles tend
to simplify characters down to a triangle nose
and big expressive eyes set in a rounded heart
shaped face. When you're dealing with anime
style artwork, you're working with a very
stylized caricature. It's exaggerated, and often
time fails to suggest any sort of ethnic or
racial background.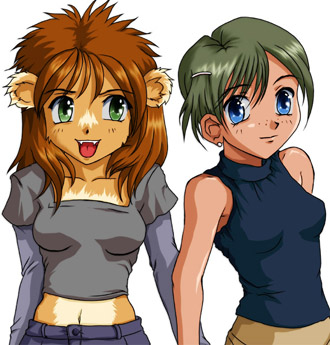 Color
can certainly serve as an indicator of racial background,
but also try adding facial details to the
drawing to emphasis ethnic traits.
Because drastic differences in skin color
outside the suggested skin tone color range in the
first section are so uncommon in anime, they often have
the effect of making a character stand out in a
crowd. This can be a bad thing, putting too much
attention on a minor character, or a good thing,
causing a character to stand out. Color
can certainly serve as an indicator of racial background,
but also try adding facial details to the
drawing to emphasis ethnic traits.
Because drastic differences in skin color
outside the suggested skin tone color range in the
first section are so uncommon in anime, they often have
the effect of making a character stand out in a
crowd. This can be a bad thing, putting too much
attention on a minor character, or a good thing,
causing a character to stand out.
Take your art style into
consideration when using colors to indicate
ethnicity. Changing the skin color on an anime
style character's cherubic doll-like rounded
face would probably look more odd then
convincing.
Creatures - In
the case of fantasy or science fiction related artwork,
the normal range of colors may be too confining
for your tastes. There's nothing preventing your
from making orange or blue skin tones on your characters if that's what you desire.
For these
and other characters that don't fall under the recommended color range
mentioned earlier in this section, try
developing your own character or race specific
palettes. Start with a base skin tone, and then
select your highlight and shadow colors (see the
below). If you're
not currently working on a picture, but want to
save these colors for a later time, just simply
open up a document in a graphics program, blot
some colors down, and then save the colors for
later use. You can choose them in later pictures
by using the eyedropper tool.
|
|
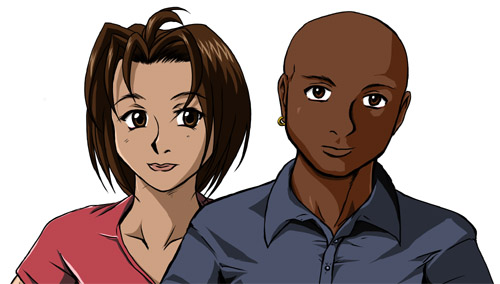
Skin tone based on personalities

Different
skin tones can suggest different personality
types. Just at a glance, you can already start to
guess
about the character's personalities based on
their skin tone. Of course, the facial
expressions don't hurt either.
 Skin colors will vary from character to character, however slightly. In my artwork, I try to give each of my characters a realistic but notably different skin tone. I've found that variations
in skin tone make for a more colorful and interesting picture, especially if there's a lot of skin to be shown off. Skin colors will vary from character to character, however slightly. In my artwork, I try to give each of my characters a realistic but notably different skin tone. I've found that variations
in skin tone make for a more colorful and interesting picture, especially if there's a lot of skin to be shown off.
I sometimes like to reflect the personalities of my characters with their skin colors. I tend to fall back on stereotypes when selecting skin
tones based on personality (i.e. shy = pale
skin; athletic = tan), but the results always seem to work
well. Just from looking at the character's skin color, clothing, hairstyle, and posture, you can already begin to guess something about their personality.
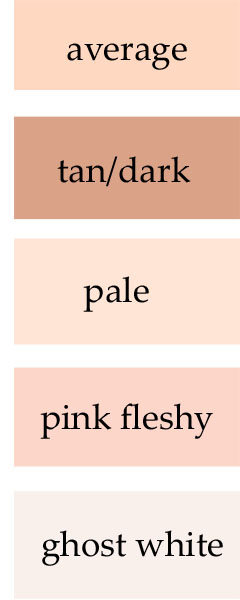
The following is just a list of examples, and is by no means the only "formula" you should follow when assigning a skin color to your character. A withdrawn character is just as capable of having tan skin as the outgoing character. Use your judgment, and choose the skin color that you feel works best for your characters.
Average flesh tone - What I mean by average is the flesh tone most commonly used on anime characters. This would be an average character, with no unusual quirks in their personality, with no reason for either too light or too dark a skin tone. Very
healthy looking skin.
Tan or dark flesh tone - Tan skin seems to suit
a tough character that gets him/herself in a lot
of fights. Likewise, an athletic character might play a lot of
outdoor sports, and extended exposure to the sun
would result in tan skin. As tan skin suggests
masculinity; male characters and tomboyish or masculine girls and
could also benefit from darker skin tones.
Pale flesh tone - A shy or withdrawn character would generally stay indoors. Lack of sunlight would render their skin pale and delicate. Gentle, feminine characters often have softer skin tones.
Pink fleshy skin tone - This would work well with pampered princesses and princes, healthy characters, children, and bouncy playful characters.
Ghost white skin - Good for weak and sickly characters.
|
|
|
|
|
 4. Shadows and
Highlights 4. Shadows and
Highlights
This is very important! Make
your shadow tone significantly darker color than the base skin tone.
In order to get this second color, I use the
Color Picker to choose
the first one, and the go about a centimeter to the right diagonally from
this initial starting point. An intense contrast
between the first tone and the second tone gives the character more depth. Very
little difference between tones can lead to unnoticeable
shadows, making your characters look two
dimensional and flat, almost as
if you never bothered putting shadows on the picture.
Highlights should be a significantly lighter color
than the base skin tone. This highlight should either be a bright
white, or a lighter version of the base skin tone. It can
be acquired the same way the shadow color is, but going a
centimeter in the opposite direction - diagonally to the upper left.
|
|
|
|
|
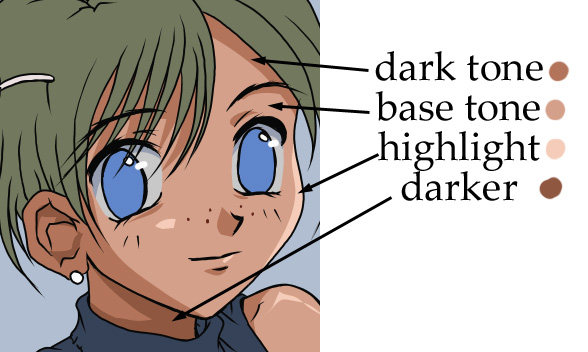 Lights
and Darks for Skin Tones Lights
and Darks for Skin Tones
To use any of the suggested colors featured in
this section, just select them with the eyedropper tool
and apply them to your own pictures. ^_^
Here's a more in-depth look at the 4
types of skin tone colors. Note that
the color you see the most is the base color.
More information can be
found on shadows and highlights in the tutorial
section appropriately titled Shadows
and Highlights.
|
|
5.
Hue
and Saturation
 When choosing colors for
your image, don't fret too much over color choice.
It is good to have some colors in mind when you
begin, so you can save yourself some time and
trouble, but if you find later that you dislike one of the colors you've chosen, it's really
easy to change, even after shading and highlights
have been placed. When choosing colors for
your image, don't fret too much over color choice.
It is good to have some colors in mind when you
begin, so you can save yourself some time and
trouble, but if you find later that you dislike one of the colors you've chosen, it's really
easy to change, even after shading and highlights
have been placed.
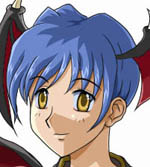
For example, let's say I don't like Viviane's
blue hair color in the image on the right. To
change the color, I first carefully using the selection tool so I don't accidentally
change the colors of any other objects that might also be on the hair layer. Then, I choose
Adjust on the Image menu, and Hue/Saturation on the submenu. This will bring up the .
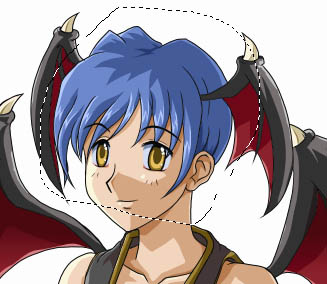
 Adjusting
the slider on the three sets of bars will change the
color of his hair. Hue will change
the color of his hair, from green to blue to
red, and everything in-between. Saturation will
change the level of saturation, from bright, highly saturated colors to dull,
gray colors. Finally, lightness will
adjust the darkness or lightness of the color.
The Hue/Saturation menu is a great way to
experiment with a variety of colors, especially if you're
unsure of which color you want to use for a
particular area of your character. The colors change
in real time, so you'll be able to
preview the color changes on your character as
they're being made. Once you've got a new color
that you like, just hit OK, and you're done! Adjusting
the slider on the three sets of bars will change the
color of his hair. Hue will change
the color of his hair, from green to blue to
red, and everything in-between. Saturation will
change the level of saturation, from bright, highly saturated colors to dull,
gray colors. Finally, lightness will
adjust the darkness or lightness of the color.
The Hue/Saturation menu is a great way to
experiment with a variety of colors, especially if you're
unsure of which color you want to use for a
particular area of your character. The colors change
in real time, so you'll be able to
preview the color changes on your character as
they're being made. Once you've got a new color
that you like, just hit OK, and you're done!
|
|
|
|
|
|