|
|
|
In This Section:
[]
[]
[]
|
Chapter 3
|
 |
 |
|
|
|
1.
Introduction to Image Cleanup
Cleanup is the next logical
step after an image has been scanned. Depending on many factors, as discussed in the
scanning section, cleanup can be quick and simple or tedious and complex. Cleanup, as the
name would imply, is the process of tidying up and
removing unwanted elements from a scanned image,
such as smudges, gray areas, eraser crumbs,
digital noise, stray lines, etc. Besides removing
unwanted junk, cleanup also focuses on getting the
picture sharp, dark, transparent, and ready for coloring.
|
|
2.
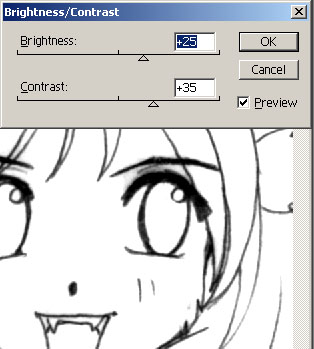
Brightness / Contrast
Brightness and contrast sliders are useful for cleanup on
both pencil work lacking sharp dark lines and
clarity, and inked line work where the scanned
line art isn't quite black and the paper isn't
quite white. If the scanned image in question
already has crisp black lines, skip this section
and move onto the Replace Color section.
|
|

Various levels of
Brightness.
Brightness
controls the amount of light and dark in an image.
Increasing the brightness setting does an
excellent job of eliminating unwanted light gray tones
from an image, and bleaching the lighter tones.
Avoid decreasing the brightness below 0. A negative brightness
number will darken lines, but more significantly, it'll
cause the white paper to grow increasingly gray,
which is an undesirable effect.
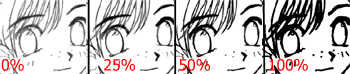
Various levels of Contrast.
|
|
Contrast
sharpens the divisions between colors or tones. If
too much brightness is applied to an image, the
black lines will become too light. Gradually turn
up the contrast to counterbalance this effect.
Turning up the contrast on a pencil sketch will replace the soft gradation
of the tones with sharper black and white
divisions. For image cleanup, contrast in the
10%-50% range should effectively sharpen and
darken the line art to a pleasing degree. Be
careful: too much contrast will make your line art
look jag6ged and clumpy (note the image above set
to 100% contrast).
It'll require a little bit of tweaking and
guesswork, but the goal is to adjust the contrast
and brightness until the lights are lighter and
the darks are darker in the scanned image.
Remember that if your image already has distinct
dark and light divisions, adjusting the brightness
and contrast may not be necessary. When in doubt,
use sparingly.
|
|
|
|
|
3.
Replace
Color
Reduction of grain and
image noise can be easily done through the Replace
Color option without negatively affecting the quality
of the line art. Using Replace Color, lighter gray tones can be selected based on color
value and then replaced with white, making cleanup
a much easier task.
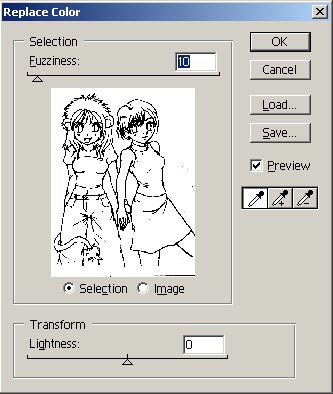 Replace
Color is located under the Image menu on the Adjust
submenu. Depending on the color mode your image is
set at, the Replace Color interface slightly
differs. If the scanned image was scanned and left
in grayscale mode, the interface will resemble the
picture on the right. If your image is set on color mode,
the Replace Color interface will have some
additional sliders, but will otherwise work the
same. Replace
Color is located under the Image menu on the Adjust
submenu. Depending on the color mode your image is
set at, the Replace Color interface slightly
differs. If the scanned image was scanned and left
in grayscale mode, the interface will resemble the
picture on the right. If your image is set on color mode,
the Replace Color interface will have some
additional sliders, but will otherwise work the
same.
About the interface.The eyedropper tool
contained within Replace Color is similar to the
eyedropper tool on Photoshop's tool palette, which
allows colors to be easily selected from within an
image. The only difference is that the colors
chosen with Replace Color's eyedropper tool will
be replaced with a different color. For the
purpose of cleanup, that color is white.
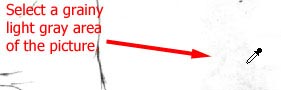
You can use Replace Color's eyedropper on
either the preview window or the actual image
itself. It's usually easier to
find the light gray tones on the full size image
so just scroll around the image until you notice
something to select.
The second
eyedropper tool,
denoted by a plus sign, will allow you to select
more then one tone if needed. Most times, however,
selecting a single tone will suffice.
|
|
The Fuzziness
Slider controls how tones similar to
the selected color are influenced. To give an example, if an
area of pure white was selected and the fuzziness setting was set at 0 then only white would be altered by the
Replace Color command. Increasing the fuzziness
slider slightly would cause the effects of the
Replace Color command to spill over
into other near white areas of
the image. As the fuzziness slider setting is placed
higher, more of the gray tones would be selected and altered in accordance with the Lightness setting, which
is discussed briefly below.
Fuzziness is a key setting in image cleanup.
However, this setting lacks a distinct wrong or
right answer. The slider
will need to be readjusted on a case-by-case
basis. Start with 10% fuzziness and gradually
adjust the slider until an acceptable level of
gray tones is removed from the image.
Lightness controls
how the selected image
data is altered. Turning the Lightness up will
bleach out the selected tone with white. For the
purposes of cleanup, always turn up lightness to
100%.
The effects of the Replace
Color operation
are reflected in the actual image as changes are
made so there shouldn't be any surprises when you hit OK to complete the process.
|
|
|
|
|
|
|
|
|
|